Linode Stack Scripts for Red Team Infra Automation
- Published
Introduction
Oftentimes during an assessment, the need arises to rapidly deploy new infrastructure. Whether it be a redirector for command and control, a phishing server or a simply server to be used for SOCKS proxying, deployment automation can save a ton of time so the focus can be on the fun stuff and not small, tedious tasks.
A lot of blogs tend to focus on AWS, Azure or GCP which are great platforms for offensive security infrastructure but there isn’t a lot out there talking about using Akamai’s Linode platform. I’ve been using Linode for a long time and it’s a great and relatively easy platform to use for operations since they offer several services such as compute, storage, StackScripts (more on that later) and a robust marketplace.
This blog will mainly focus on utilizing StackScripts for deployment. I’ll also be releasing a tool called Rednode here along with this blog post that wraps several Linode APIs to help perform automatic deployment.
What are StackScripts?
StackScripts are Linode’s way of running automatically configuring your Linode during deployment. They’re essentially bash scripts that run the first time your Linode starts up. These StackScripts can be configured to accept parameters to fine tune the StackScript. Linode offers several prebuilt StackScripts through their library but, for our use case, we’re going to make our own that accept our own, custom parameters.
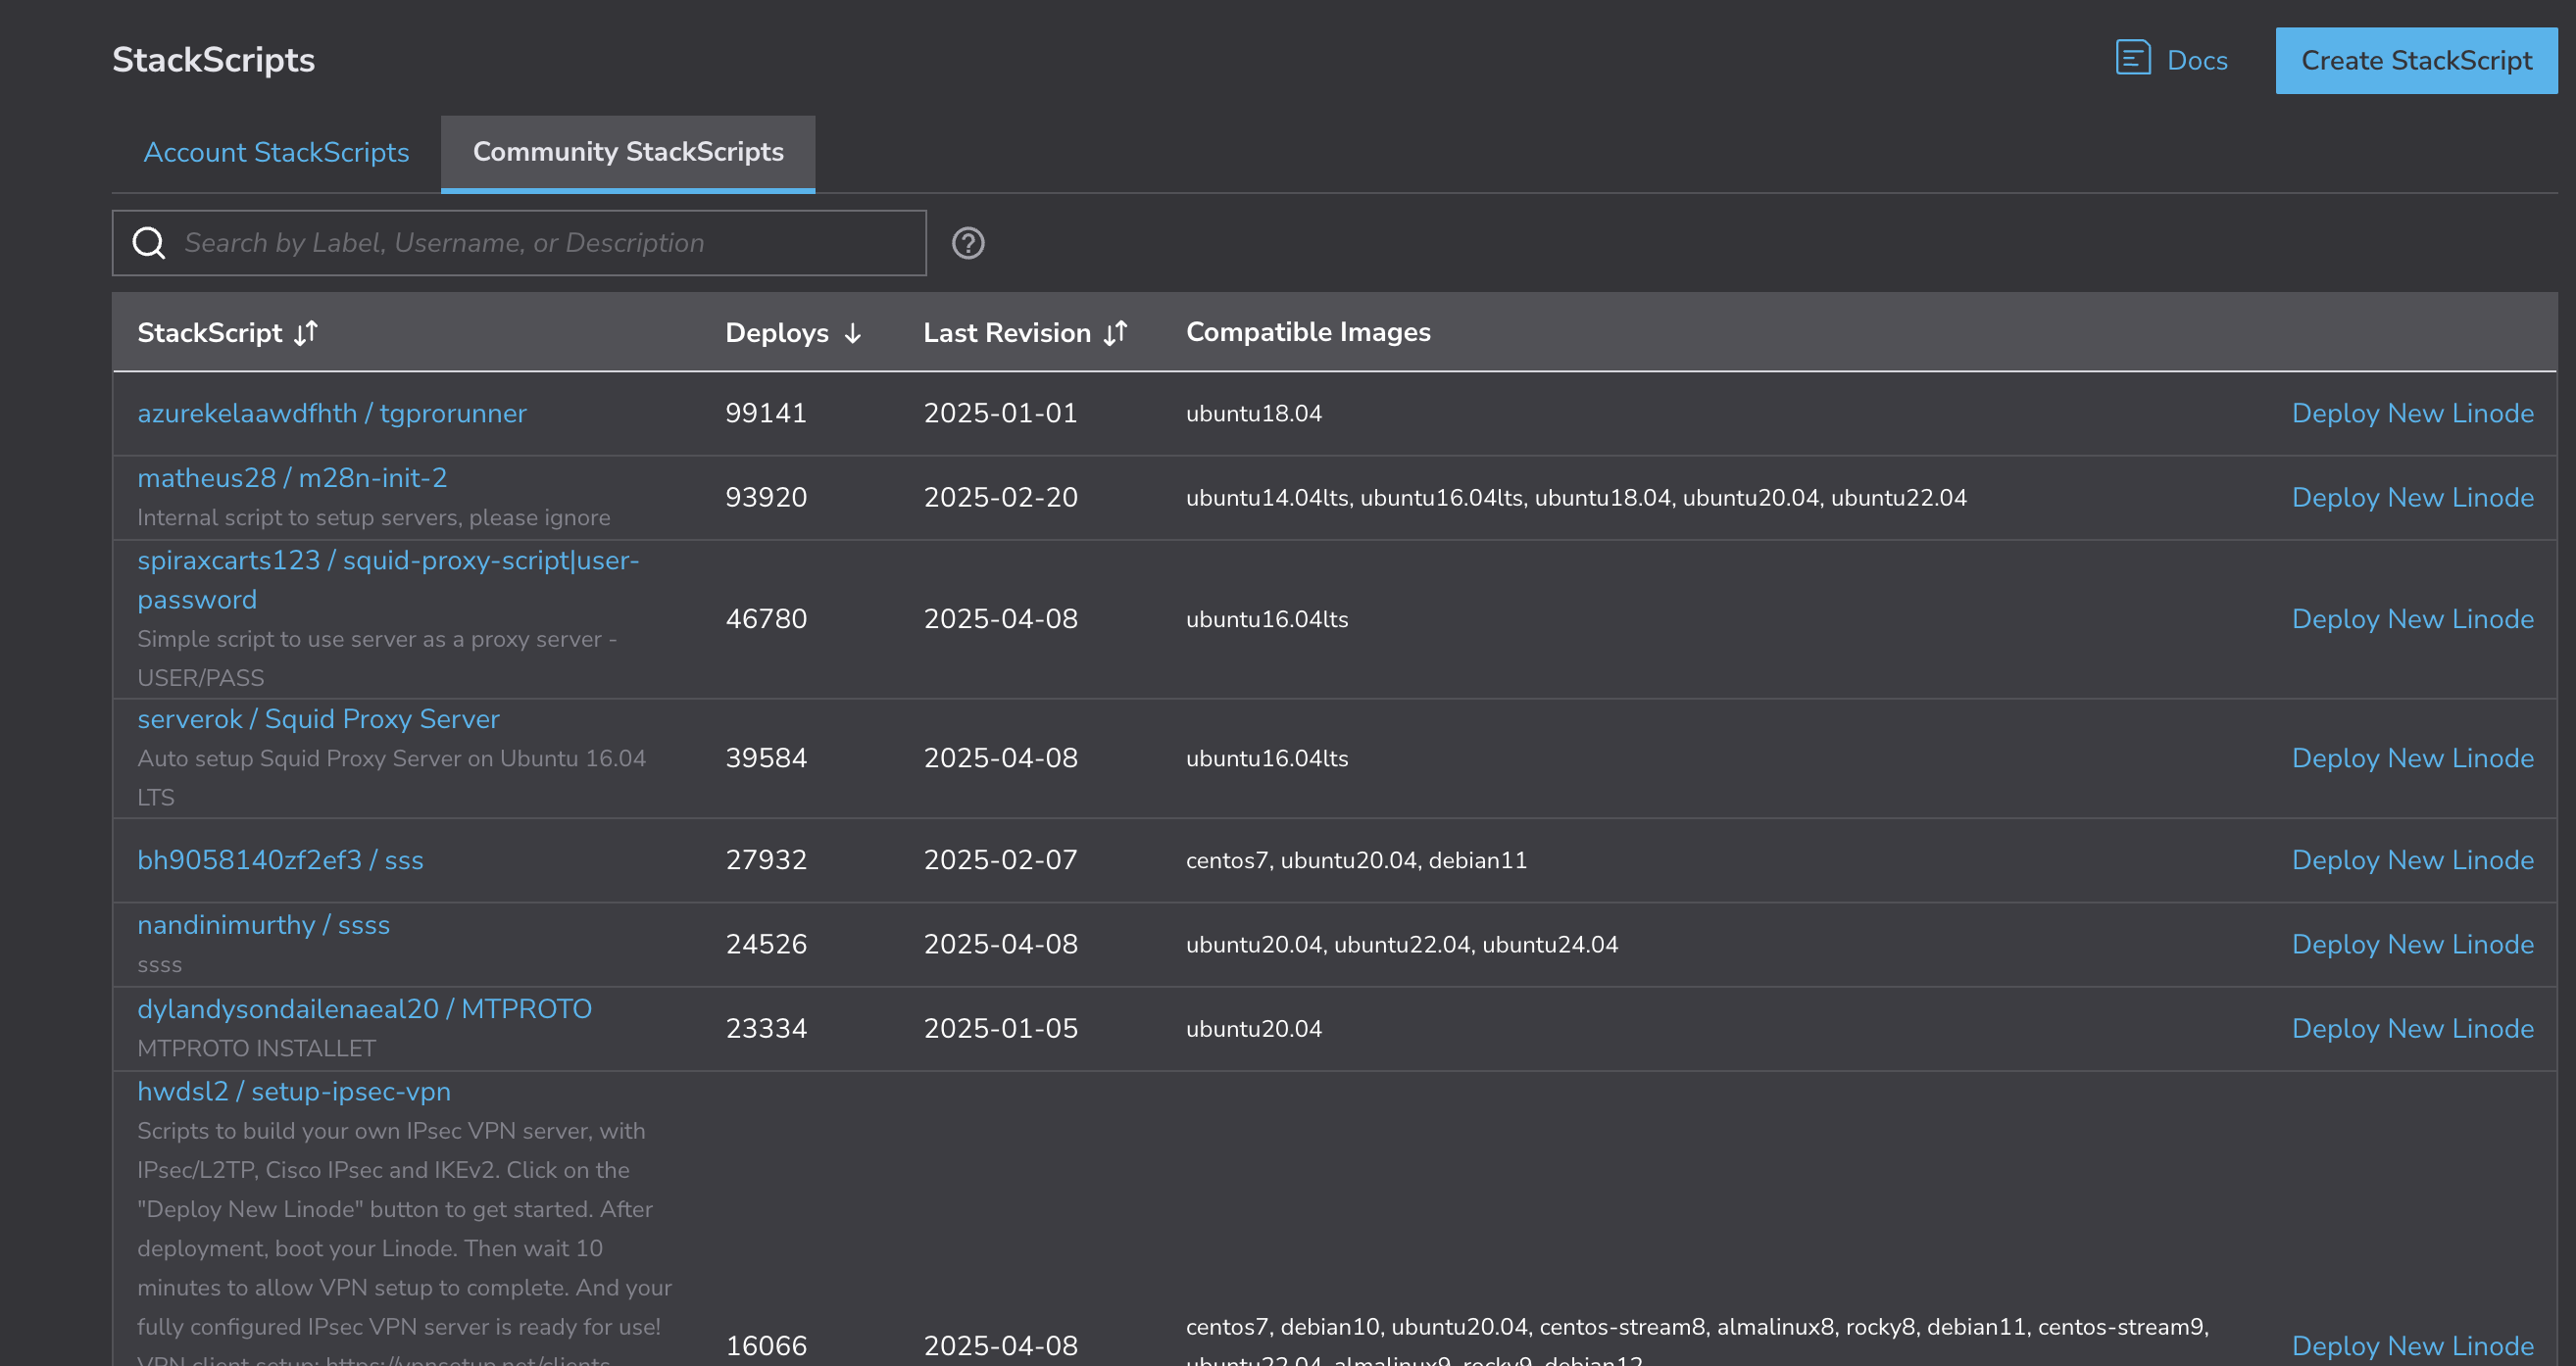
StackScripts User Defined Fields
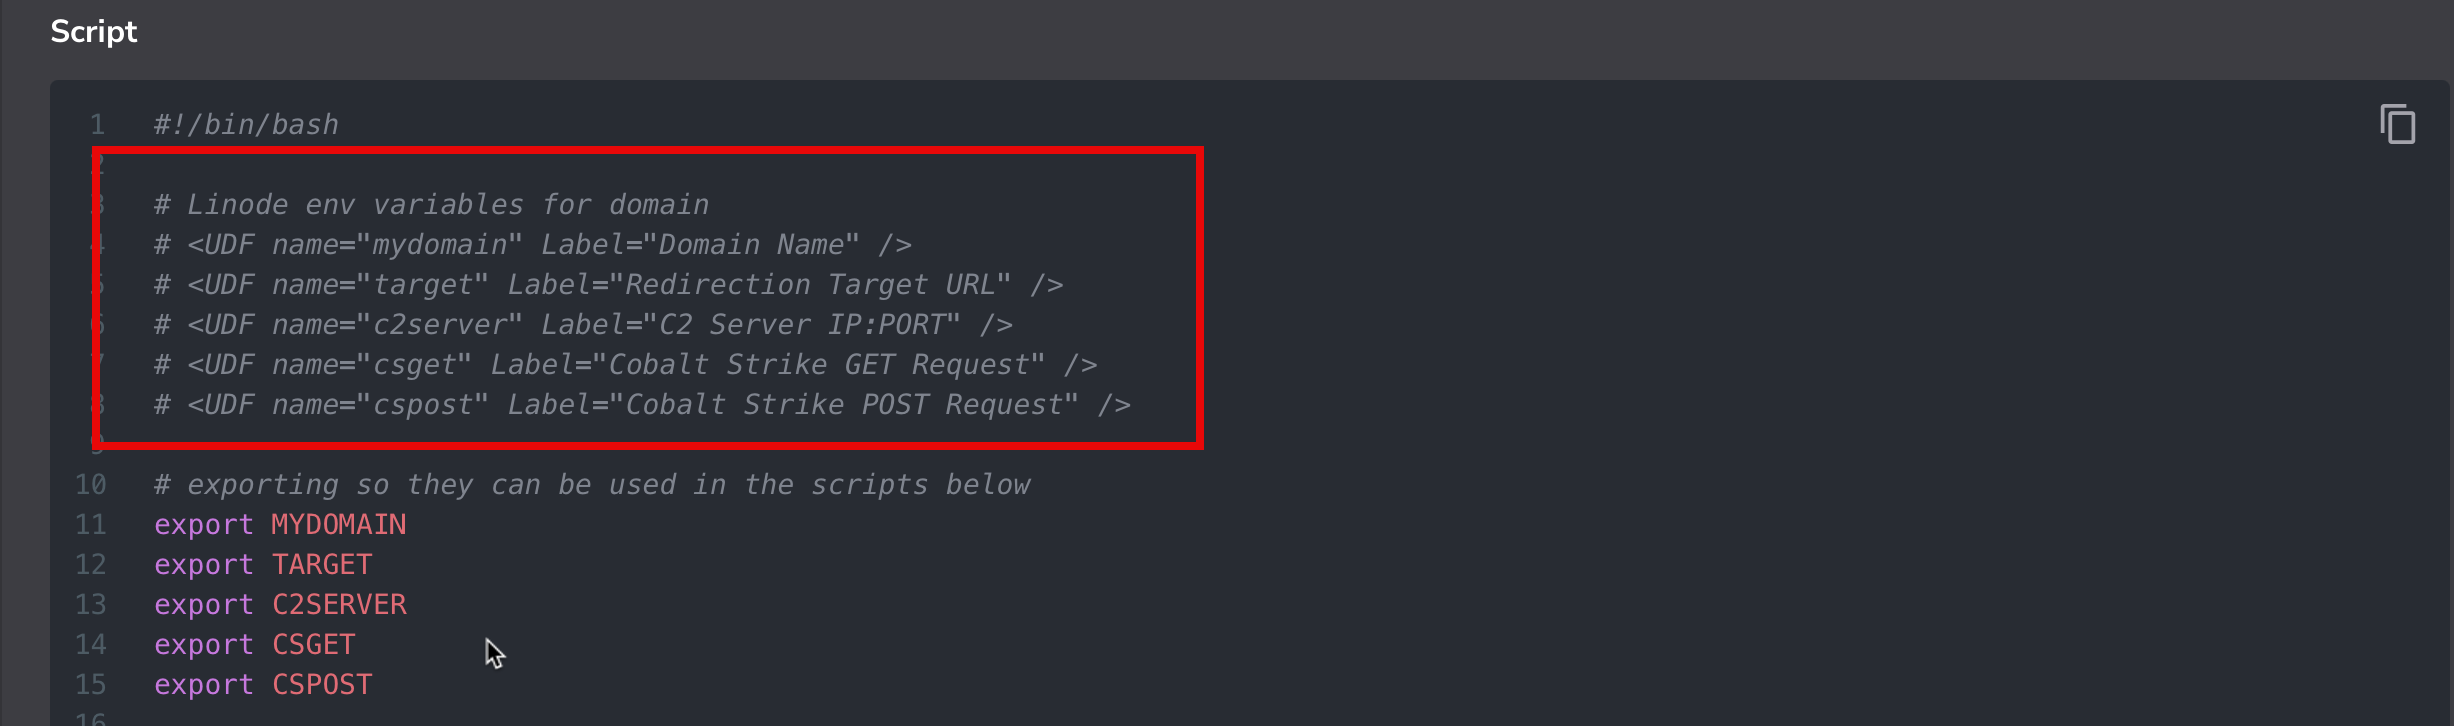
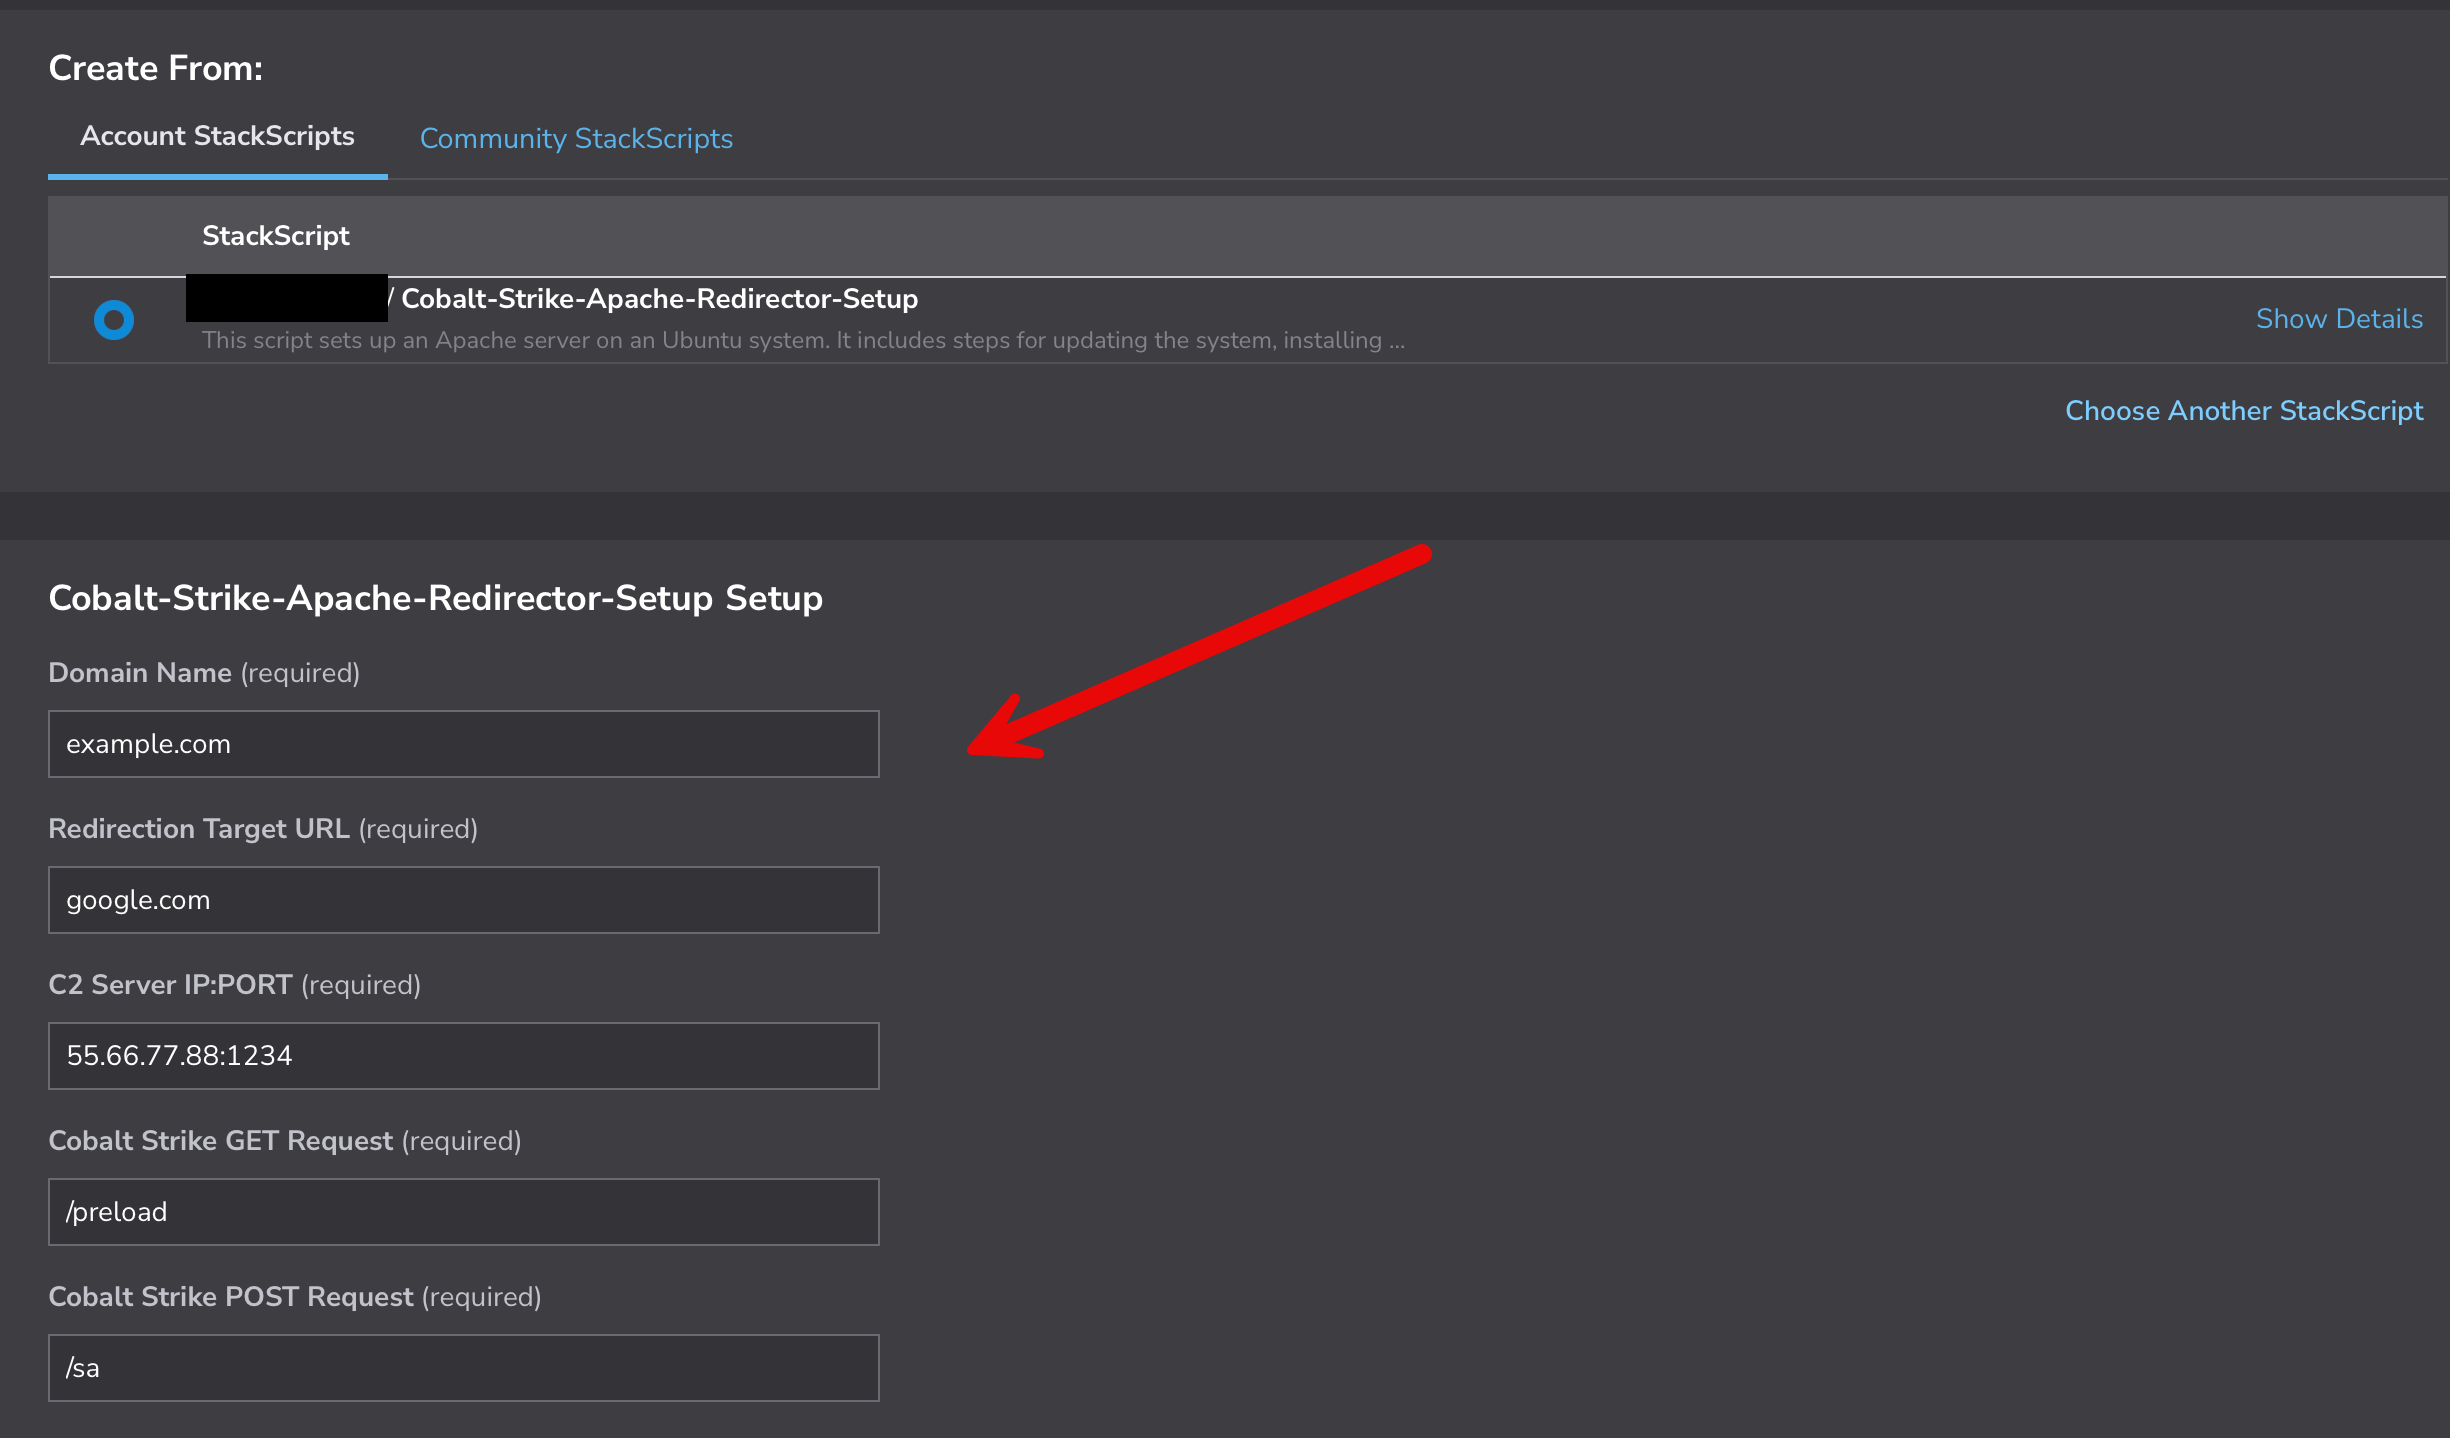
StackScript’s can be configured to accept parameters that get translated to Linux environment variables so they can be passed in to our StackScripts. These parameters are called user-defined fields (UDFs). They utilize a special syntax within our StackScripts in the form of # <UDF name="mydomain" Label="C2 Domain" example="C2 domain for ops." /> This UDF will make the $MYDOMAIN variable accessibly in our script. The screenshots below show of the UDF code in the StackScript and the StackScript in the web UI that will accept several UDF values that will be utilized in our script that will setup an Apache redirector.
Building Our Own StackScripts
As mentioned before, we can utilize these StackScripts to build out red team infrastructure. For this example, and tool release, we’re going to create a StackScript that deploys a relatively cheap Linode instance running Ubuntu 22.04 LTS, installs an Apache web server, creates a Linode domain and sets the proper DNS records, then configures some Apache security settings and sets up rules for redirection. This script will be customized for use with Cobalt Strike but it can be tweaked to be used with any command-and-control framework.
Cobalt Strike Apache Redirector Setup StackScript
Below is the main StackScript that will call the base64 encoded bash scripts in charge of installing Apache and configuring it. The reason base64 encoded bash scripts are used is this scripts use A LOT of special characters and whitespaces so I was getting very inconsistent results or straight up failures if I didn’t encode them in base64. There may be a better way to call those scripts but doing it this way allowed me to consistently deploy the infrastructure properly. The base64 was generated by using the built-in Linux utility base64 -w0 -i <file>.
Here we define the UDFs mentioned earlier. These UDFs will not only be available in the web UI but they will also be accessible via the Linode API that RedNote uses. Since we’re calling two additional scripts, we’ll also have to export those UDFs so they can be accessible by the script’s bash process.
A sleep command was also thrown in there before the install-apache.sh and apache-config.sh gets called that will pause the main StackScript’s execution to allow RedNode plenty of time to call the appropriate Linode APIs to configure the domain and it’s DNS records.
Some Apache configurations and bash script code was taken from White Knight Lab’s Advanced Red Team Operations course. Check out their course here if you’d like to learn some cool things.
#!/bin/bash

# Linode env variables for domain
# <UDF name="mydomain" Label="Domain Name" />
# <UDF name="target" Label="Redirection Target URL" />
# <UDF name="c2server" Label="C2 Server IP:PORT" />
# <UDF name="csget" Label="Cobalt Strike GET Request" />
# <UDF name="cspost" Label="Cobalt Strike POST Request" />

# exporting so they can be used in the scripts below
export MYDOMAIN
export TARGET
export C2SERVER
export CSGET
export CSPOST

# sleep just to give scripts time to create domain
sleep 60

# install-apache.sh
echo "IyEvYmluL2<....SNIP....>cudHh0CmV4aXQgMA==" | base64 -d | sh

# apache-config.sh
echo "IyEvYmluL2<....SNIP....>JhcKZXhpdCAw" | base64 -d | sh
Below we’ll dig into install-apache.sh and apache-config.sh a little bit.
install-apache.sh
For brevity, I won’t post the whole script in this blog post but it can be found in the accompanying tool’s repo here. I’ll go over some highlights however. This script is in charge of installing Apache and some of it’s modules and doing some basic configuration such as creating some directories. This script also enables SSL and requests certificates for our redirector.

apache-config.sh
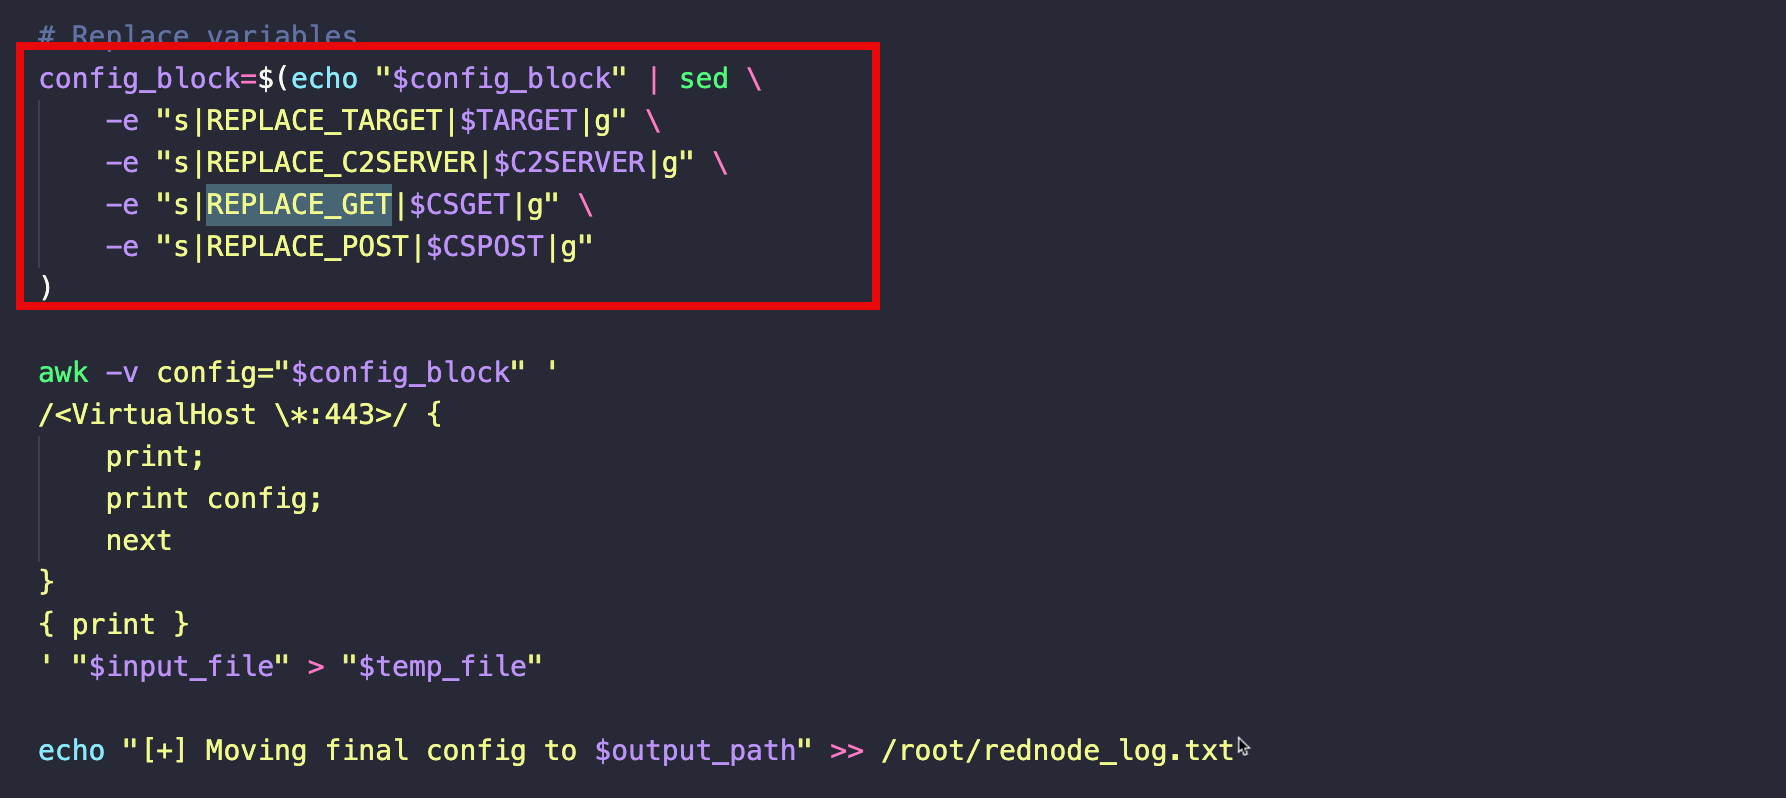
As mentioned previously, I won’t post the whole script for this bash script either but I’ll mention some highlights. This script can be found here. This script mainly configures Apache’s mod_rewrite rules with some awk magic as well as doing some simple search and replace for our C2 redirection target, C2 server, GET and POST requests we previously defined as UDFs.
The main component of this script is adding the following configuration to our domain’s Apache configuration file. This configuration basically adds some headers and three mod_rewrite rules: blocking suspicious user agents, custom header checks and C2 URI GET and POST request checks.
################################################
# CONFIGURATION
################################################
SSLProxyEngine on
SSLProxyVerify none
SSLProxyCheckPeerCN off
SSLProxyCheckPeerName off
ProxyPreserveHost on
RewriteEngine on

Define REDIR_TARGET REPLACE_TARGET
Define C2_SERVER REPLACE_C2SERVER
Define CS_GET REPLACE_GET
Define CS_POST REPLACE_POST

################################################
# FIRST RULE: BLOCK SUSPICIOUS USER AGENTS
################################################
RewriteCond %{HTTP_USER_AGENT} (google|yandex|bingbot|Googlebot|bot|spider|simple|BBBike|wget|cloudfront|curl|Python|Wget|crawl|baidu|Lynx|xforce|HTTrack|Slackbot|netcraft|NetcraftSurveyAgent|Dirsearch|FeroxBuster|Ffuf|Gobuster|Masscan|Masscan-ng|Media|Nessus|Nikto|SMRF|WPScan|l9explore|l9tcpid|sqlmap|palo|PaloAlto|Proofpoint|proofpoint|Symantec|symantec|Mimecast|mimecast|rapid7|Rapid7|Elastic|virustotal) [NC]
RewriteRule ^(.*)$ ${REDIR_TARGET}

################################################
# SECOND RULE: CUSTOM HEADER CHECK
################################################
RewriteCond %{HTTP:Access-X-ControlCDN} ^$
RewriteRule ^(.*)$ ${REDIR_TARGET} [L,R=301]

################################################
# THIRD RULE: URI CHECK FOR GET AND POST REQUESTS
################################################
RewriteCond %{REQUEST_URI} ^${CS_GET}.*$
RewriteRule ^${CS_GET}.*$ %{REQUEST_SCHEME}://${C2_SERVER}%{REQUEST_URI} [P]
ProxyPassReverse / %{REQUEST_SCHEME}://${C2_SERVER}

RewriteCond %{REQUEST_URI} ^${CS_POST}.*$
RewriteRule ^${CS_POST}.*$ %{REQUEST_SCHEME}://${C2_SERVER}%{REQUEST_URI} [P]
ProxyPassReverse / %{REQUEST_SCHEME}://${C2_SERVER}

################################################
# ADD ADDITIONAL LEGITIMATE HEADERS
################################################
Header always set X-XSS-Protection "1; mode=block"
Header always set X-Frame-Options "SAMEORIGIN"
Header always set X-Content-Type-Options "nosniff"
Header always set Referrer-Policy "strict-origin"
Header set Content-Type "text/html; charset=utf-8"
The code below is responsible for replacing our UDF values within the configuration file from above.
Automation Time
I’m in the middle of learning Go so I created a tool which I call Rednode to automate all of these steps and leave room for future automations (CDN C2 callbacks, phishing infra etc.) while simultaneously learning me some Go. Currently, this tool currently only supports creating a Linode utilizing the Apache redirector stack script. The link to the project can be found on my Github here.
As far as perquisites goes, you’ll need the following:
- A valid Linode account with the ability to create Linode and domains.
- A domain that you own as well as the ability to configure DNS at the registrar level. Currently, Linode Domains do not function as a registrar so you’ll have to use Namecheap, GoDaddy etc.
- Configure your domain to use Linode’s DNS servers:
- ns1.linode.com
- ns2.linode.com
- ns3.linode.com
- ns4.linode.com
- ns5.linode.com
- Configure your domain to use Linode’s DNS servers:
- Create your own StackScript in Linode and copy the contents of the stackscript.sh file located in the /stackscripts folder within the project. You can change the script contents if you want but it’s not necessary. I’ve also included the decoded scripts. Set the StackScript to be private would probs be beneficial as well.
Rednode Configuration
Setup the configuration in config/config.go, shown below. Currently, these configuration options are done via simply modification of the source code but I may (or may not) plan on making them command line options.
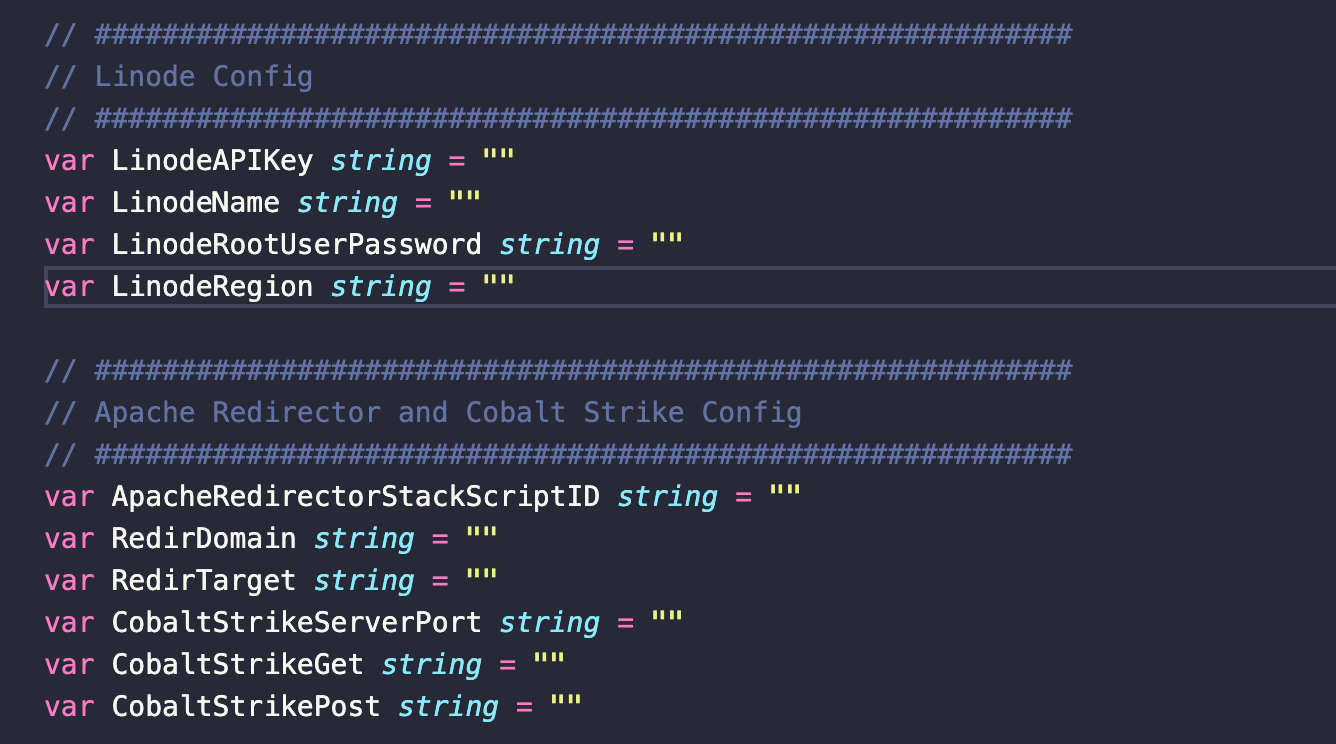
Here is a quick overview of the configuration:
- LinodeAPIKey - the API key for Linode.
- LinodeName - the name (or label as Linode calls it) for the Linode instance.
- LinodeRootUserPassword - the root user’s password for the Linode instance.
- LinodeRegion - the region/location where this Linode instance will be located. To see available locations, use the
-list-regionscommand line option. - ApacheRedirectorStackScriptID - the ID used to identify what StackScript to use for deployment. This can be found via the command line option
--list-stackscripts. - RedirDomain - this is the C2 callback domain. Please do not make this your Teamserver. This should only be a redirector.
- RedirTarget - this is the domain where invalid traffic will be redirected to.
- CobaltStrikeServerPort - this is your Teamserver IP. Note that this variable will really only be used for string substitution so it doesn’t have to be a public IP and port. The format is
1.2.3.4:8443. - CobaltStrikeGet - the GET request from your Cobalt Strike malleable C2 profile GET block.
- CobaltStrikePost - the POST from your Cobalt Strike malleable C2 profile POST block.
Other helpful command line options are:
--list-linodeslist your deployed Linodes with some metadata.--list-regionslist available regions for deployment--list-stackscriptslist your available stackscripts with some metadata.--list-domainslist your available domains with some metadata.--delete-domain <domain id>delete the domain with the specified ID.--delete-linode <linode id>list the Linode instance with the specified ID.
As previously mentioned, Rednode really just wraps a few Linode API calls into some functions and calls them in the right order to do our setup and automation. Linode’s API is pretty extensive and allows you to do a lot of things so I highly recommend checking it out and implementing some features of your own.
Example Usage
Say we have a red team op and one of redirector domain is superbadserver.com and our command-and-control of choice for this op is Cobalt Strike. We are also going to use the Amazon malleable C2 profile. Our config.go would like this.
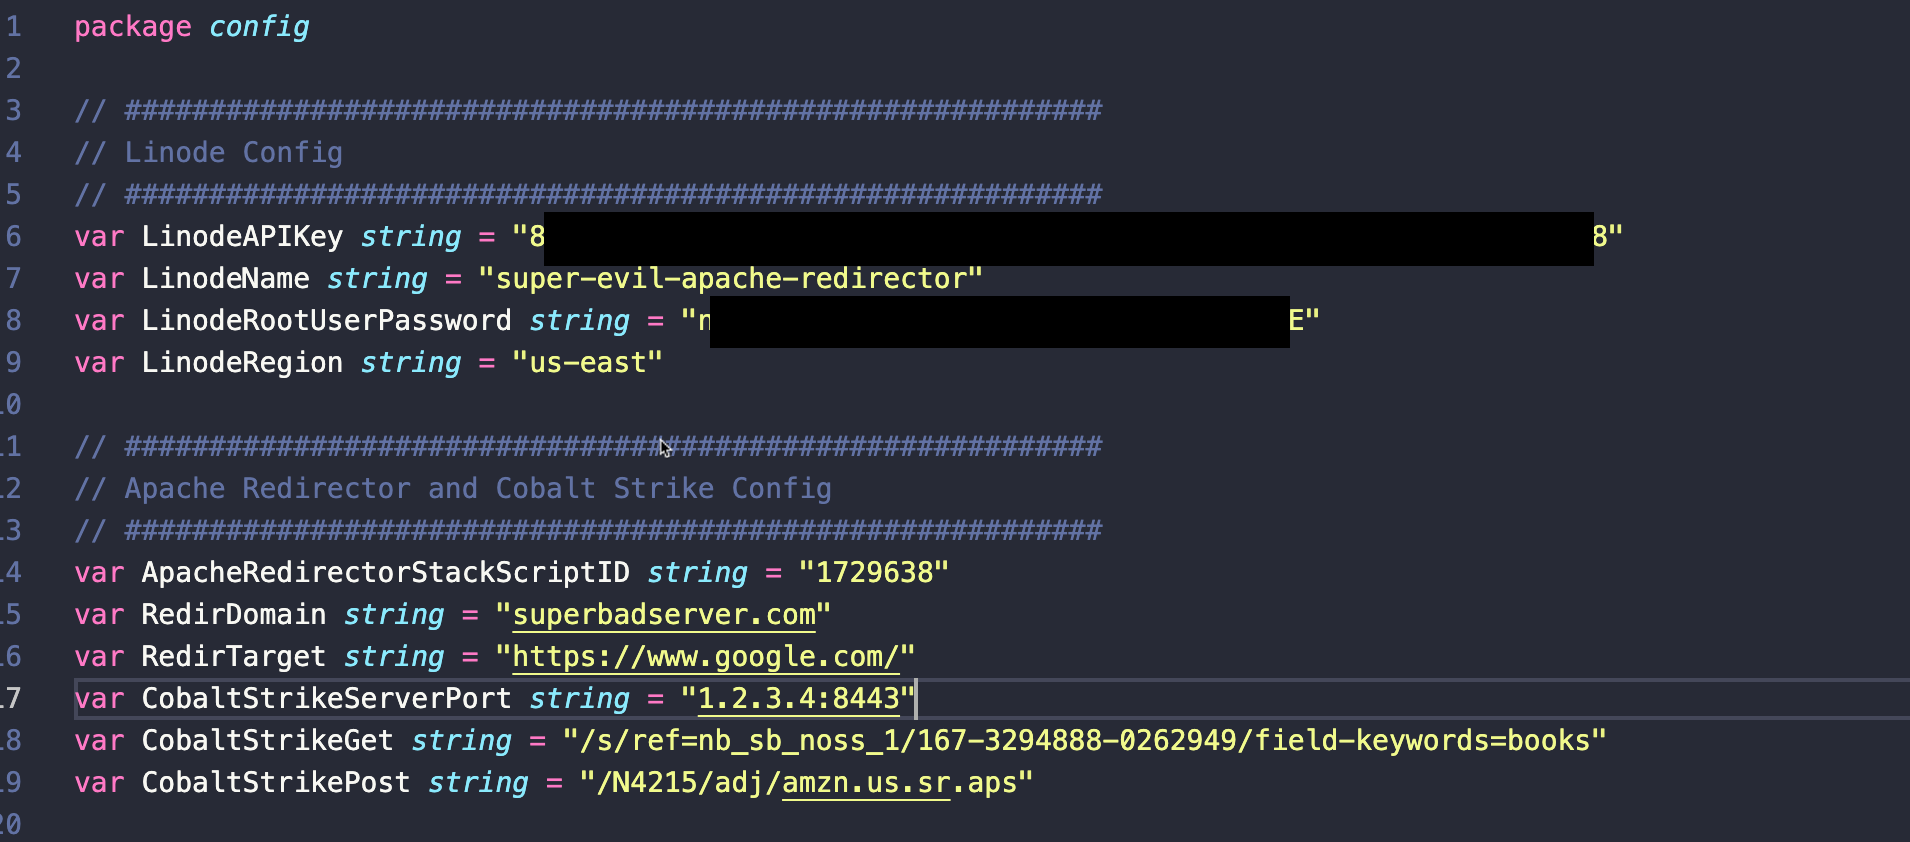
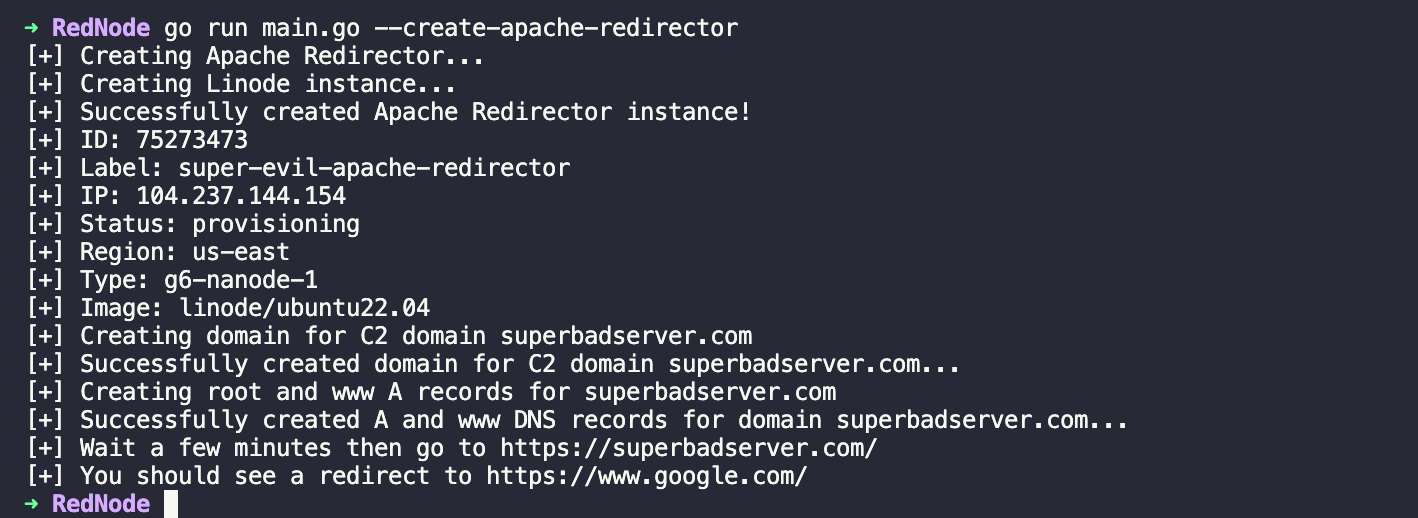
Then we’d just simply run go run main.go --create-apache-redirector and after about 5-10 minutes (depending on DNS and whatnot), our redirector should be setup and ready for operations. You should see similar output.
Conclusion
It’s been really fun learning Go and building this tool. I have some cool (to me) plans for this tool such as incorporating other Linode features and possibly incorporate other platforms into this tool such as Azure CDN. Other quality of life changes and honestly, better Go code will be used as I learn more and as things come up.
As mentioned at the beginning of this article, I’ve used Linode for a long time and I’ve had nothing but good experiences using Linode. It’s generally more cheaper then other platforms but your mileage will vary. I highly recommend considering using Linode next time you plan for an op.
Please feel free to submit a pull request or if you have any issues. You can find the project here at https://github.com/D4rthMaulCop/Rednode/tree/main.